In VS Code
The ubCode extension surfaces the whole Pharaoh loop without leaving the editor: two dedicated Pharaoh panels in the sidebar, a Pharaoh Agent conversation panel for driving an ACP agent in place, workflow colouring and a gap overlay on the needs graph, and CodeLenses on every need. This page tours those surfaces.
Caution
The VS Code surfaces are the newest and most in-flux part of the feature. Panels, labels, and controls are still changing from release to release — treat the names below as a guide rather than a contract.
UI elements
The Pharaoh Workflows panel
In the ubCode activity-bar container, the Pharaoh Workflows panel is a vertical lineage graph of the need you are focused on: its ancestors above, the focused need in the middle, its descendants below. Each row is a need (not a stage), annotated with the workflow stage it belongs to and that stage’s state.
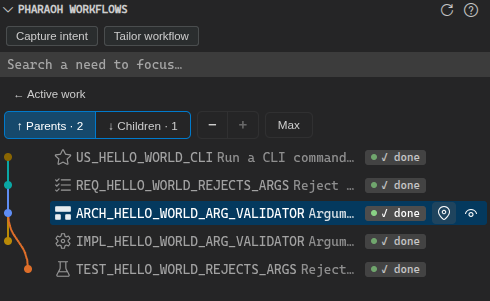
The Pharaoh Workflows panel: the focused need’s lineage, badged with stage states and gap chips.
A row shows:
a type icon, chosen per need type (and overridable with [workflow.icons]);
the need id and title;
a state badge —
✓ done,ready,blocked,▶ NEXT(the recommended next step),⏳ awaiting review, or⚠ stuck · <reason>;a gap chip naming what the need is missing (for example
⚠ no test).
When the recommended next step is a need that does not exist yet, a ghost row
with a to create badge marks where it will go.
Its controls:
- Depth
A directional selector —
↑ Parents · Nand↓ Children · N— with−/+to show fewer or more levels in the active direction andMaxfor the full lineage. The depth is sticky as you move focus.- Expand / collapse gutter
When a lineage has more parallel rails than fit, a toggle switches between
Graph clipped to fitand a scrollable expanded view.- Capture intent / Tailor workflow
Buttons for the same-named commands (see Commands). A small Copy intent prompt icon beside Capture intent copies the intent authoring prompt for any agent to paste.
- Search and back
A Search a need to focus… box, and a ← Active work button that returns the panel to the git-derived list of what you are working on right now.
- Per-row actions
Every row with a next stage carries a Copy drive prompt icon, always shown, that puts the drive prompt on the clipboard for any agent. Next to it, when your agent is one ubCode integrates, a Drive button hands the step straight to it: ▶ Drive prefills Copilot Chat, and a Drive in Pharaoh panel icon sends the prompt to the Pharaoh Agent panel over ACP. Which one appears follows
ubcode.agent.id(see Settings).- Title bar
Refresh re-indexes and redraws; Help toggles an in-panel help sheet.
When nothing is focused, the panel shows Active work — the stream derived from
your uncommitted changes (ubc agent next with no anchor).
The Pharaoh Gaps Overview panel
Its sibling, the Pharaoh Gaps Overview panel, is a project-wide census — never
scoped to the focused need. A header reads <N> needs · <M> gaps, and a
By need / By type toggle switches between one row per gapped need (with a
chip for each missing artefact) and one section per missing type (Missing test,
and so on).
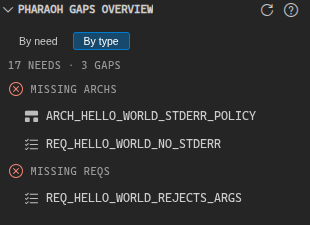
The Pharaoh Gaps Overview panel: the project-wide census of open gaps.
On a fresh project it doubles as an on-ramp: it offers Set up project (ubc agent install) when there is no configuration, and Capture intent / Tailor workflow when there are no needs yet.
The Pharaoh Agent panel
When ubcode.agent.id is an ACP agent (claude-code, mistral-vibe, or opencode), the Drive
action does not open a terminal or a foreign chat window. It sends the prompt to the
Pharaoh Agent panel, ubCode’s own conversation view. The panel sits at the top
of the ubCode activity-bar container, above Pharaoh Workflows and
Pharaoh Gaps, and holds one running ACP session. It starts collapsed (for the
default GitHub Copilot agent it is inactive, so it does not take the space), and
Drive or Capture intent reveal it on use. Click its header to open it for
manual chat. Pharaoh Workflows is the expanded panel the container opens on.
It works the same whichever ACP agent you pick, because both speak the Agent Client Protocol. In the panel you see the agent’s replies stream in, and when the agent wants to run a tool or touch a file it asks inline, so you answer each request as it comes and a driven step never edits your project behind your back. The buttons on a request are the agent’s own: usually allow and reject, but an agent may offer more (Claude Code asks how to leave plan mode with three), and the panel shows each one under the label the agent gave it. A tool call is a collapsed line you can expand to see what was run and what came back. You can also type directly into the panel to continue the conversation.
An agent picker in the panel toolbar chooses who you talk to without editing
settings. Claude Code and Mistral Vibe drive the panel over ACP (it
repoints ubcode.agent.id and restarts the
session). GitHub Copilot switches ubcode.agent.id to Copilot and leaves
the panel inactive, since Copilot runs in the native Copilot Chat, not here.
A blank conversation offers ready-made Capture intent and Drive next step prompts as one-click buttons (or Onboard Pharaoh when the project has no workflow yet). New session clears the conversation after an inline confirm, and Auto-approve allows tool permissions for the session without a card each time (allow-once each, nothing saved to disk).
Both ACP agents need an API key, which the panel reads from the environment VS Code was launched from (it never stores keys).
Mistral Vibe needs MISTRAL_API_KEY (or a key in vibe’s own config) set
there before you pick it. Without it the first turn fails with a missing-key
error.
Claude Code over ACP needs ANTHROPIC_API_KEY, an Anthropic
Console API key, not a Claude
subscription login. Anthropic does not permit subscription (Pro, Max) OAuth
credentials in third-party clients or the Agent SDK
(legal docs), so the
panel checks for the key before spawning and refuses to start Claude Code
without it, rather than silently falling back to a logged-in subscription
session. To use a Claude subscription, run Claude Code natively instead.
How the ACP panel works
The panel speaks the Agent Client Protocol (ACP), the same protocol Zed uses to host external agents. Useful things to know when working with it:
- Where the agent runs
The agent is a separate process the panel launches (chosen by
ubcode.agent.id), talking JSON-RPC over stdin/stdout. It runs in your workspace with the project’s installed skills available, so it can read and edit files and run commands the same way it would in its own CLI. The panel is the client: it shows the conversation and relays your input, it does not run the tools itself.- Documentation grounding
The panel’s agent can search and read the official sphinx-needs and ubCode documentation through two MCP tools,
search_docsandfetch_doc_page, so it grounds product and how-to answers on the real docs rather than guessing. The@pharaohCopilot participant grounds on the same documentation engine, reached through the language server instead. Either way the pages are fetched from the public documentation sites over the network, and no project data is involved.- Skills, per agent
ACP has no standard channel for handing skills to an agent, so each reads them its own way. Claude Code auto-discovers
.claude/skills, whereubc agent installwrites them. Mistral Vibe and OpenCode read the harness-neutral.agents/skillslocation, whichubc agent installalso writes, so they see the same skills as Claude Code. For Vibe the panel grants the workspace trust when it launches it (Vibe loads no project-local config, skills orAGENTS.md, until the folder is trusted).- Tools and what you see
When the agent runs a tool (reads a file, runs a command, edits a need), the panel shows it as a row you can expand to see the input and the result. The agent decides what to run; the panel reflects it. An agent that acts without asking (some models are eager) will not raise a permission request, so the row is your record of what happened.
- Answering the agent
For an open-ended question the agent just writes it and you type your answer as the next message. For a decision it needs gated, it sends a permission request, which the panel renders as a card with the agent’s own options as buttons. ACP has no separate “ask the user a multiple-choice question” call, so agents use permission requests for that too: leaving plan mode in Claude Code, for instance, offers three buttons. Always allow (when an agent offers it) means the agent may stop asking for that kind of action for the rest of the session, so read the label before clicking it. Auto-approve answers the plain allow-once option for you and never the always variant.
- Sessions
One conversation is one ACP session, held for the life of the panel. A Drive action starts a fresh session each time, since a driven step is a self-contained task and should not inherit an earlier conversation’s context. Your own chat in the panel continues its session, so follow-up questions keep their context. New session clears the current conversation by hand (it cannot be undone today, and restoring a previous conversation is tracked separately). Moving the panel to another location keeps the session and its transcript.
The Pharaoh Intent from Code panel
Recovers the requirements, the architecture and the user stories of an existing codebase from the code itself. The panel shows your source files as a folder tree, with what each folder was recovered into, and a request form that hands a recovery to your configured agent. Recovering intent from code explains the steps and how to use the panel.
The needs graph
The needs graph view gains workflow awareness: nodes are coloured by need type, the trace links between them are drawn as labelled edges, and a need still missing a required link carries a red marker naming that link.
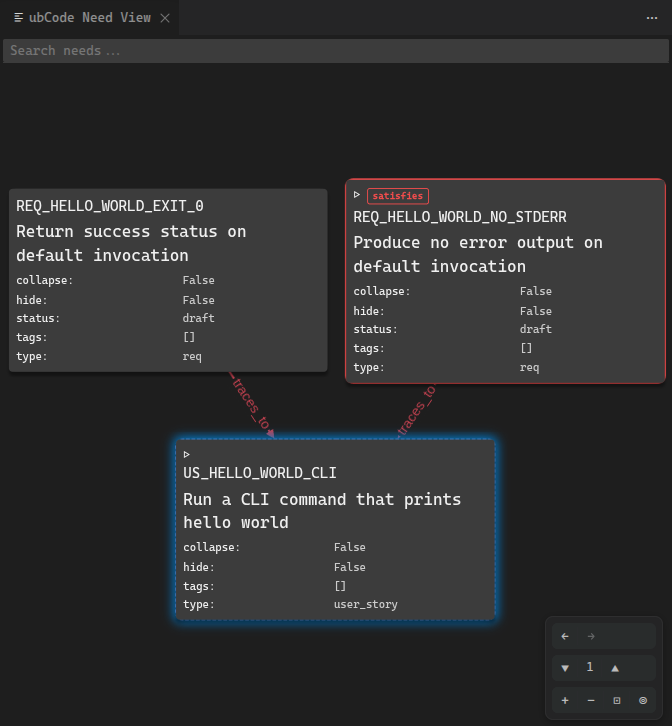
The needs graph: nodes coloured by type, trace links as labelled edges, and a red marker flagging a need that is missing a required link.
Click any node to make it the focus, which also updates the Pharaoh panels.
The workflow editor and flow views
Two more webviews visualise the process itself:
Open Workflow Editor draws your
[workflow]as a V of stages — each a node coloured by the type it produces, edges labelledleads_to, optional stages dashed and tagged[optional]. Selecting a stage shows itsProducestype, itsAuthoringdirective, its hard-gate and soft-review chips, and where it lives inubproject.toml.Open Flow shows the V-model stream for the currently focused need.
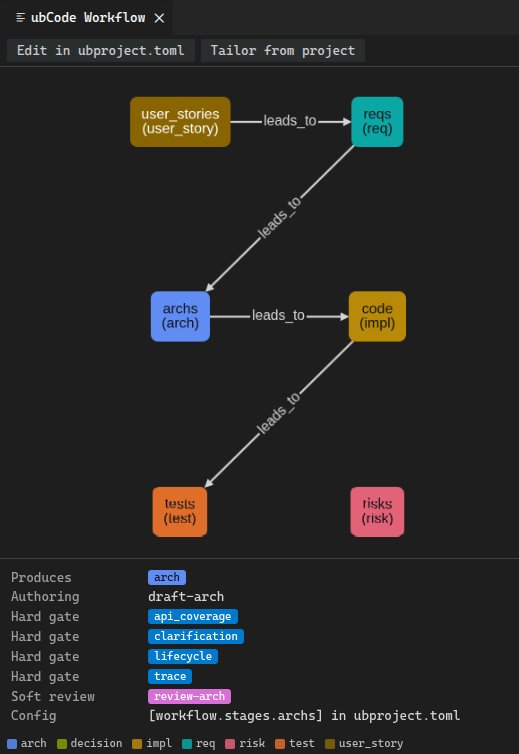
The workflow editor: your [workflow] drawn as a V of stages,
with the selected stage’s details.
Quality analysis (Run QA)
The review and quality gate has an in-editor front end. Run Quality
Analysis (the ubcode.need.runQA command — command palette, the editor right-click
menu, or Ctrl+Alt+Q / Cmd+Alt+Q — with a need under the cursor) scores that need
against its criteria pack using the editor’s own language model. ubCode never calls a model
provider itself; the first run asks which model to use, and you can pin it with the
ubcode.qualityAnalysis.llmselection setting.
The result opens in the ubCode Quality Analysis panel (the Show Quality Analysis
Results command, ubcode.need.qaResults): one row per axis with its score, the
reviewer’s reason and suggestion, any floor breach highlighted, and a freshness banner when
the verdict no longer matches the need or its rubric. Inline, a QA CodeLens shows a
reviewed need’s verdict state and score at a glance.
Both surfaces refresh live: a verdict is just a file under .pharaoh/verdicts/, so a
verdict written out of band — by the drive loop, or by ubc agent verdict-submit on the
command line — updates the panel and the lenses automatically.
Run QA follows ubcode.agent.id too, so the agent you pick for Drive also scores QA. Pick an
ACP harness (claude-code, mistral-vibe, opencode) and Run QA scores each need through it, on
its own model and key, instead of Copilot. Since ubcode.agent.id defaults to copilot, Run
QA stays on Copilot unless you pick an ACP agent. Because an ACP agent scores on its own model
and API key, choosing (say) claude-code for Drive also routes Run QA through that agent’s key
rather than the Copilot model. To score with a different agent than you drive
with, set ubcode.qualityAnalysis.agentId (for example copilot to keep QA on Copilot while
driving with an ACP agent). Using a different agent for QA than for authoring avoids the
self-review bias a single model has when it scores its own work, and scoring quality tracks the
model you choose. Absolute scoring accuracy against a labeled corpus is unmeasured for any agent,
Copilot included.
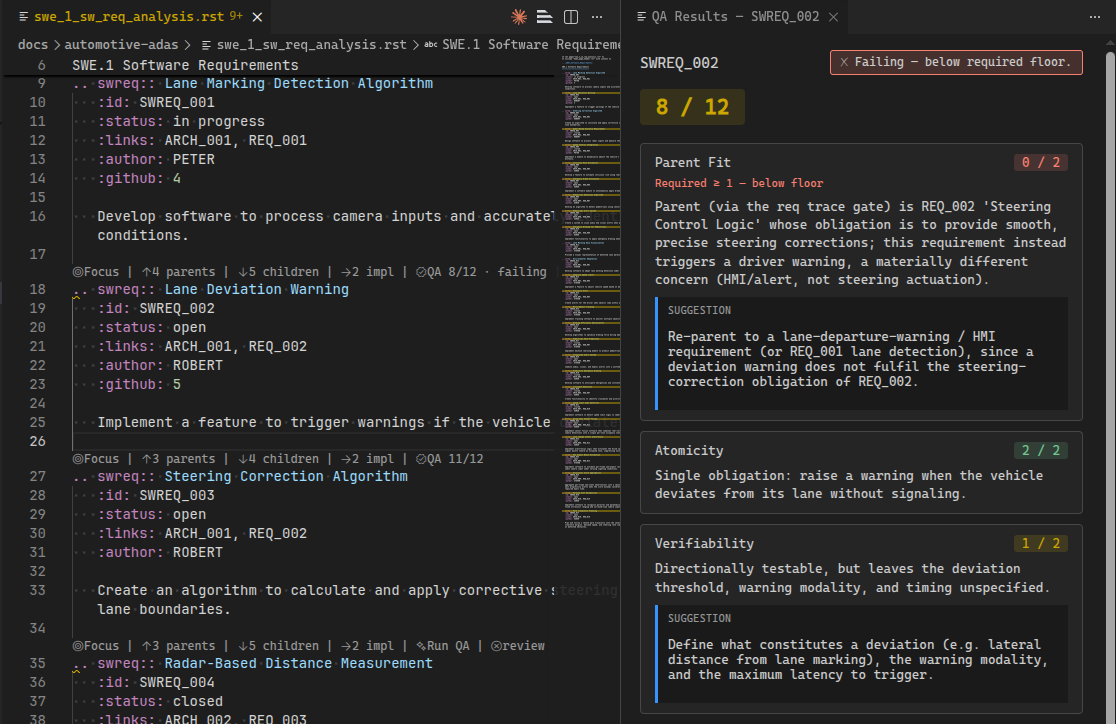
The ubCode Quality Analysis panel: per-axis scores with the reviewer’s reasons and suggestions, and a below-floor axis highlighted as failing the gate.
Commands
All of the following live under the ubCode category in the command palette
(Ctrl+Shift+P):
- Focus Need in Pharaoh Panel
Reveal the Pharaoh Workflows panel and focus the selected need. (Also reachable from the Focus CodeLens, and — from a need in an RST file — via the editor right-click entry Show ubcode need ID in the Pharaoh panel.)
- Drive Next Step
Hand the focused need’s next step to your agent. How it is delivered follows
ubcode.agent.id(see Settings): Copilot Chat is prefilled, an ACP agent receives the prompt in the Pharaoh Agent panel, or the prompt is copied to the clipboard. Nothing runs until you send it.- Change Request
Send your agent a change-request prompt to propagate an edit downstream through the V (the
change-requestcascade). Delivered the same three ways as Drive Next Step.- Accept Authored Artefacts
Stage and commit the artefacts the assistant authored, with an attribution message.
- Capture intent (/pharaoh-intent)
Capture a high-level intent as the root artefacts your workflow defines. It follows the same three routes as Drive: Copilot Chat opens prefilled with
@pharaoh /pharaoh-intent, an ACP agent gets the authoring prompt driven into the Pharaoh Agent panel, and any other agent gets it on the clipboard. All three build the same prompt (root artefact type, routed path, id convention) from the workflow and the engine brief. A Copy intent prompt icon beside the panel’s Capture intent button copies that prompt on demand, whateverubcode.agent.idis set to.- Tailor workflow
Derive a proposed
[workflow]from the project’s need types and links, preview the TOML, and write it intoubproject.toml(with an option to refine it in chat).- Install agent skills
Run
ubc agent installin a terminal to scaffold the profile’s skills into the project.- Register MCP server with Claude Code
Register the ubCode MCP server with Claude Code running in your own terminal. Offered when
ubcode.agent.idisclaude-code-cli, which is the one harness that takes an automatic per-project registration.It requires a project that is already set up: it runs the same
ubc agent installthat Set up project runs, so on a folder with noubproject.tomlit would scaffold one rather than only register. Run Set up project first in that case.It asks before it starts anything, and the dialog is where the details are. The entry is named
ubcodeand recorded at local scope in Claude Code’s own.claude.json(in your home directory unlessCLAUDE_CONFIG_DIRmoves it). Claude Code keys it on the nearest.gitat or above the project, or on the project’s own directory when there is none. Every ubcode project under that same.gitshares the single entry, so the first to register owns it, and only one of them can hold it at a time. A submodule or a nested checkout carries its own.git, so it gets its own entry rather than sharing the superproject’s. The run also writes any missing agent assets, most of which go to that same root, so they land outside the project directory whenever the root is above it. It rewrites ubc’s install record, leaves what is already there as it is, and the ubCode Agent output lists what was written.When an entry is already there recording something else, or one at user or project scope would shadow it, nothing is changed and the notification carries the step to take, naming the directory to take it in.
- Run Quality Analysis / Show Quality Analysis Results
Score the need under the cursor against its criteria pack (using the editor’s model), and open the results panel. See Quality analysis (Run QA).
- ubCode: Open Flow / ubCode: Open Workflow Editor
Open the two process webviews described above.
Settings
These settings tune how the agent commands behave:
ubcode.agent.idWhich agent the Drive Next Step and Change Request actions dispatch to. The value picks how the prompt is delivered:
copilot(default) prefills GitHub Copilot Chat in the editor, the one native integration. It falls back to the clipboard if the Copilot command is absent.claude-code,mistral-vibe, andopencodedrive the Pharaoh Agent panel over ACP (the Agent Client Protocol). These three ids are reached over ACP only, so pick one from the panel’s agent selector.claude-code-cliis Claude Code running in your own terminal rather than in the panel. The action copies the prompt for you to paste, so it uses whatever login that terminal already has and needs noANTHROPIC_API_KEY(which theclaude-codeACP adapter does require). Run ubCode: Register MCP server with Claude Code from the command palette (orubc agent install --register-mcp claude-code-cli) to make the ubCode MCP tools available in that terminal. It registers the server with Claude Code’s ownmcp add, keyed to the same directory the install writes.claude/into: the nearest.gitat or above the project, or the project directory when there is none. That key is shared, so in a repository holding several ubcode projects only ONE of them can hold the registration, and the entry names that project’s configuration for every terminal session started anywhere under the key. Registering a second project there reports the first as drift and changes nothing. Claude Code resolves a local registration from the repository root of wherever it is started, so you can startclaudeanywhere inside the repository. Without a repository it resolves the directory it is started in, so start it in the project directory.The entry records the path of the
ubcthat wrote it, and that path carries a version. Registering from the editor records the copy bundled with this extension, so an extension update leaves the entry pointing at a binary that is gone: Claude Code can no longer start the server, and registering again is refused while the name is taken. Run the command again after an update.ubc agent doctorreports the stale entry as drift, and its fix names theclaude mcp removeto run and the directory to run it in.Registering from a terminal with an
ubcyou installed yourself avoids the update cycle, at the cost of pinning whatever version that copy is.othercopies the drive prompt to the clipboard so you can paste it into any agent ubCode does not integrate.
ubcode.agent.cliPathThe path to the
ubcbinary the need-level agent commands invoke (defaultubc).ubcode.qualityAnalysis.llmselectionThe Copilot model Run QA uses to score needs. Leave empty to be prompted on first use.
ubcode.qualityAnalysis.agentIdThe agent Run QA scores with. Empty (default) follows
ubcode.agent.id, so the agent you drive with also scores QA. Set it to pin QA to a specific agent, e.g.copilotto keep scoring on the Copilot model while driving with an ACP agent. Using a different agent for QA than for authoring avoids self-review bias, and scoring quality tracks the model you choose.
Gap diagnostics
Gaps also appear in the Problems panel, and as squiggles on the need’s directive
line: a warning <id>: gap in <category> for a structural gap, and an information
<id>: needs clarification for a clarification marker. The gap CodeLens jumps
straight here.
CodeLens elements
On needs in .rst and Markdown files, ubCode renders a row of CodeLenses
just above the directive — which lenses appear depends on the need. Each is one
click:
- Focus
Focus this need in the Pharaoh panel (the same action as the Focus Need command). Shown on every workflow-scope need — any need whose type the
[workflow]covers (a type a stage produces, or the up target of a stage’s trace edge) — so you can jump into the lineage from areqorarchin the middle of the chain, not just from a feature root. A need whose type the workflow never references (a plainnote, say) gets no Focus lens; the Focus Need command still works for any need.- Parents
Shown as N parent(s); jumps to the parent need’s source (a picker when there is more than one, and the parent’s id in the hover tooltip when there is exactly one).
- Children
The mirror of Parents — shown as N child(ren), jumping down to a child need.
- Code trace
Shown as N impl · M tests; opens the source file(s) the need’s codelinks point to. Omitted when the need links to no code.
- Gap
Shown only when the need has a gap — the reason(s), such as no test, no impl, or clarify for a clarification marker. Clicking it opens the Problems panel.
- QA
Shown on a reviewed need with its verdict state and score. Clicking it opens the ubCode Quality Analysis panel for the need. See Quality analysis (Run QA).
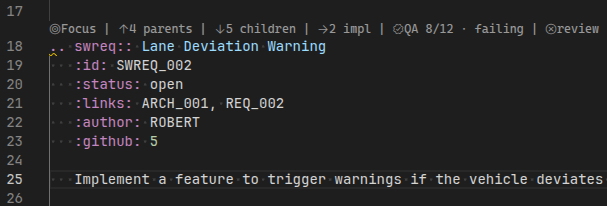
The CodeLens row above a need: navigation and gaps, one click away.
Note
The CodeLens row is on by default. Disable it project-wide with the
code_lenses key in the [server] section of ubproject.toml
(see server configuration) to remove the lens line above
every need.
See also
Quick start — driving the loop, of which these surfaces are the visual front end.
The ubc agent command — the engine the panels and lenses call.