Needs tutorial
This tutorial builds a small but complete traceability model, step by step, for the engineering programme behind an autonomous parcel-delivery drone. Along the way you will declare your own need types, write need items and connect them with links, refer to them from ordinary prose, and finally summarise and measure the whole set with tables, diagrams, and counts.
Every example below is shown twice —
first as the source you would type,
then as the result it produces —
using the syntax-example directive
(see Directives).
The need items, roles, tables, and counts in those result panes are live —
the ubCode engine resolves and renders them as you edit —
and this published site renders every example, diagram views included,
with Sphinx-Needs.
(Where the two engines differ, the tutorial says so; see the note by the flow
diagram below.)
Before you start
You will get the most from this walkthrough with ubCode already installed (Installation) and the vocabulary from Key concepts fresh in mind — or keep the Glossary open to look a word up as you go, since the tutorial declares its own need types and connects them with link types. A little reStructuredText helps too, though the examples are short enough to follow without it.
How ubCode handles a need
ubCode keeps a live model of your project and refreshes it on every keystroke, rather than computing everything once at the end of a build. Three things happen in the background as you type: it reads each need directive out of your source files and captures the fields you wrote; it connects the needs — matching links to their targets, resolving variant and dynamic values, and filling in back-links; and it checks the result — validating IDs, field values, and link targets against your configuration, and surfacing anything inconsistent as a diagnostic.
Running this loop continuously is what sets ubCode apart from a batch build: a broken link or a duplicate ID appears the instant you introduce it, not after a build. The table and count views you meet later read straight from this live model, so they always reflect the project’s current state.
Defining need types
A need type is a category of need that becomes a directive of the same name.
ubCode does not assume a fixed set of types;
you declare exactly the ones your project uses in ubproject.toml.
For the drone programme we want three types —
a top-level Project, the Requirements it drives,
and the Specifications that realise them.
Each entry gives the directive name, a human-readable title,
and a prefix for automatically generated IDs;
the optional style and color keys control how the type appears
in flow diagrams:
[[needs.types]]
directive = "dr-project"
title = "Project"
prefix = "P_"
style = "folder"
color = "#E8DAEF"

[[needs.types]]
directive = "dr-req"
title = "Requirement"
prefix = "R_"
color = "#D4EFDF"

[[needs.types]]
directive = "dr-spec"
title = "Specification"
prefix = "S_"
color = "#D6EAF8"
To make IDs predictable across the team, you can also require them explicitly and constrain their shape:
[needs]
id_required = true
id_regex = "^[A-Z]_[A-Z0-9]{4,}$"
With id_required set, ubCode reports any need that is missing an ID,
and id_regex rejects IDs that do not match the pattern —
both while you type, long before a build.
See also
Need types for every option a need type accepts, and Core options for the ID controls.
Creating a need item
With the types declared, a need is just a directive: its title is the argument, its fields are options, and its description is the body. Here is the programme’s root item:
The project need
.. dr-project:: Autonomous delivery drone
   :id: P_DRONE
   :tags: tutorial
   :status: open

   A rotor-based drone that carries small parcels between local depots
   and customer drop-points without a human pilot,
   planning its own route and holding station in wind.
A rotor-based drone that carries small parcels between local depots and customer drop-points without a human pilot, planning its own route and holding station in wind. |
Every field you add becomes part of the need’s metadata,
so you can later filter, sort, and report on it.
The tags field, in particular, is a convenient handle
for selecting a related group of needs, as we will do below.
Referring to a need
Once a need has an ID, you can point at it from anywhere in your prose
with the need role.
By default it renders the need’s title and ID as a clickable link;
supply an explicit label in angle brackets to show your own wording instead:
The need role
The overall goal is captured by :need:`P_DRONE`.

When the sentence reads better with your own words, label the reference
yourself, as in :need:`the delivery-drone programme <P_DRONE>`.
The overall goal is captured by Autonomous delivery drone (P_DRONE).
When the sentence reads better with your own words, label the reference yourself, as in the delivery-drone programme (P_DRONE).
ubCode resolves these references as you type, and flags the role if the ID does not exist — so a renamed or deleted need never leaves a dangling reference behind.
Linking needs together
Individual needs become a model once you connect them.
The built-in links option records a generic relationship,
and you can define named link types for relationships
that read better in both directions.
For the drone programme we add one custom link type,
dr_supports, so that each requirement records the programme objective
it exists to serve:
[needs.links.dr_supports]
outgoing = "supports"
incoming = "supported by"
color = "#1A5276"
Now we can write the two requirements, each pointing at the project through the custom link:
Requirements with links
.. dr-req:: Collision-free flight
   :id: R_SAFE
   :tags: tutorial
   :status: open
   :dr_supports: P_DRONE

   The drone must detect and avoid obstacles in its flight path —
   buildings, wires, birds, and other aircraft —
   and hold a safe separation at all times.

.. dr-req:: Reliable telemetry link
   :id: R_LINK
   :tags: tutorial
   :status: open
   :dr_supports: P_DRONE

   The drone must stay in contact with the control centre throughout a
   flight, reporting position and health, and land safely if the link drops.
The drone must detect and avoid obstacles in its flight path — buildings, wires, birds, and other aircraft — and hold a safe separation at all times. |
The drone must stay in contact with the control centre throughout a flight, reporting position and health, and land safely if the link drops. |
Because dr_supports has an incoming label of supported by,
the project need automatically gains a “supported by” back-link to each
requirement — you write the relationship once, from the requirement,
and see it from both sides.
Next we add the specifications that realise the safety requirement.
Here we use the plain links option rather than a custom type,
to show the generic form:
Specifications realising a requirement
.. dr-spec:: Vision-based obstacle detection
   :id: S_VISION
   :tags: tutorial
   :status: in_progress
   :links: R_SAFE

   Forward and downward cameras feed a model that segments obstacles from
   the background and estimates their distance, driving avoidance manoeuvres.

.. dr-spec:: Geofence enforcement
   :id: S_GEOFEN
   :tags: tutorial
   :status: open
   :links: R_SAFE

   The flight controller refuses commands that would take the drone outside
   its approved corridor or above its permitted altitude.
Forward and downward cameras feed a model that segments obstacles from the background and estimates their distance, driving avoidance manoeuvres. |
The flight controller refuses commands that would take the drone outside its approved corridor or above its permitted altitude. |
See also
Link types for the full set of link-type options, and Roles for the other need reference roles.
Conditional content
Sometimes part of a document only applies to a particular build —
a specific platform, market, or review stage.
The if directive includes its body only when a condition holds,
evaluated against the project’s variant data:
A conditional block
.. if:: var.stage == "review"

   .. note::

      This section is only shown while the ``stage`` variant is ``review``.
      Use it for notes that should not reach the published manual.
Note
This section is only shown while the stage variant is review.
Use it for notes that should not reach the published manual.
The if directive is not specific to needs —
it conditionally includes any block, needs included —
which makes it the basis for building several product variants
from a single “150 %” source
(see Variant builds).
Summarising the model
With a handful of needs in place, we can start to view them as a whole. The Sphinx-Needs summary directives each select a subset of needs with a shared filter syntax and present it in a different form; this tutorial uses a table and a flow diagram.
A needtable lays the selected needs out as a sortable table.
Here we select everything tagged tutorial and choose the columns to show:
A needs table
.. needtable::
   :tags: tutorial
   :columns: id, type, title, status
   :sort: id
   :style: table
A needflow draws the same needs as a diagram, so the links between them become visible. Starting the flow at the project need and following the links outward gives a top-down picture of the programme:
A needs flow
.. needflow:: Drone programme overview
   :root_id: P_DRONE
   :show_link_names:
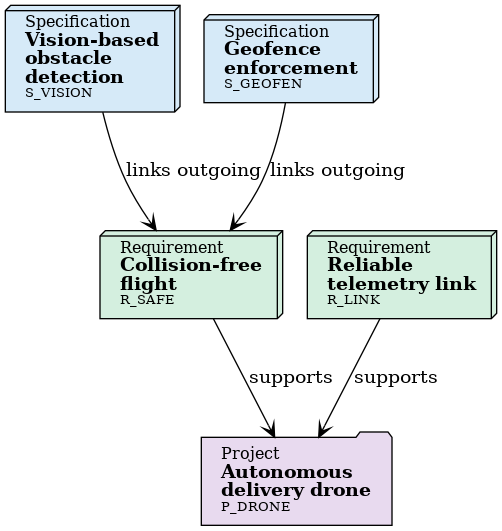
Drone programme overview
Note
needflow draws as a Mermaid flowchart in
the ubCode preview and ubc build html alike — the same diagram this
published Sphinx-Needs site shows (Sphinx renders it with Graphviz; ubCode
renders it client-side with Mermaid, so the picture is equivalent rather than
pixel-identical). The needs chart views — needpie and needbar —
render too, as inline SVG written straight into the page rather than as a
Matplotlib image file, with a legend table carrying the numbers as text.
See Differences from a Sphinx build for the full register.
Note
needflow takes three portable presentation options: :direction:
(down/up/right/left, superseding the PlantUML :config:
direction names), and two flags that may now carry a value —
:show_link_names: (none/outgoing/incoming/type, and
written bare it still means outgoing, as above) and :show_legend:,
which may name one of the project’s
[needs.flow_legends] entries. Each has a
project-wide default under [needs].
The example above deliberately writes its flag bare and uses no
:direction:: this page is built by Sphinx as well, and a Sphinx-Needs
release that does not yet know the new spellings rejects the whole directive.
A bare :show_link_names: or :show_legend: is understood by both tools
today. The one visible difference is where a legend lands — Sphinx draws it
inside the diagram, ubCode as a table beside it, because Mermaid has no
legend construct. See Differences from a Sphinx build for the details.
A needsequence reads the same links a third way. Where a flow draws every link as an edge, a sequence walks two links at a time: the needs a starting need links to become the messages, and each message need’s own links name the receivers. The middle need is therefore not drawn as a lifeline — its title becomes the arrow label, which is what makes the view good at showing a mediated relationship.
In the drone model, each specification links to the requirement it realises, and each requirement supports the programme objective. Starting at the two specifications and following both link types draws exactly that chain, with the requirement naming the arrow:
.. needsequence:: From specification to programme
   :start: S_VISION, S_GEOFEN
   :link_types: links, dr_supports
Both specifications end up pointing at P_DRONE,
each arrow labelled Collision-free flight —
the requirement that connects them.
Note
needsequence draws as a Mermaid
sequenceDiagram in the ubCode preview and ubc build html alike.
Sphinx-Needs renders it only through sphinxcontrib.plantuml, which this
documentation build intentionally omits (it would pull in a Java toolchain),
so the example above is shown as source rather than rendered here — in ubCode
it draws. See Differences from a Sphinx build for the differences register,
including how the walk handles unknown IDs and which options are inert.
For larger models it is often tidier to tuck a secondary view away behind a disclosure widget, so the page is not dominated by diagrams:
Selecting with Cypher
The filter surfaces used above — :tags:, :types:, :filter: —
judge each need on its own fields.
They cannot ask a question about the links:
“which specifications realise a requirement that supports the programme?”
is one traversal, and the python filter dialect has no way to express it.
ubCode therefore gives needlist, needtable and needflow
a :cypher: option —
a read-only Cypher graph query over the same
model, where each need is a node labelled with its type
and each link is a typed relationship.
The short form is a bare WHERE expression over the implicit node n:
A bare Cypher expression
.. needlist::
   :cypher: n.type = 'dr-spec' AND n.status = 'open'
   :types: dr-spec
   :status: open
   :show_status:
The full form is a query returning a single column of nodes,
and that is where traversal becomes available.
Following both link types the model declares —
links from a specification to its requirement,
then dr_supports from that requirement to the programme —
selects exactly the specifications that trace all the way to the objective.
Type names containing a hyphen are quoted with backticks,
as openCypher requires:
Selecting by link traversal
.. needtable::
   :cypher: MATCH (n:`dr-spec`)-[:links]->(:`dr-req`)-[:dr_supports]->(:`dr-project`) RETURN n
   :types: dr-spec
   :columns: id, title, status
   :sort: id
   :style: table
A RETURN that projects individual values,
rather than the bare node,
names the table’s columns and their headers itself.
In general that is a ubCode-only way to shape a table,
but aliasing each value to exactly the header
the python :columns: list already produces
is the portable special case:
both engines then draw the same columns, in the same order, with the same
headers, so the pairing still renders as a single table.
A long query is easier to read written across indented lines,
which the option accepts:
Naming the columns from the query
.. needtable::
   :cypher:
      MATCH (n:`dr-spec`)-[:links]->(:`dr-req`)-[:dr_supports]->(:`dr-project`)
      RETURN n.id AS ID, n.title AS Title, n.status AS Status
   :types: dr-spec
   :columns: id, title, status
   :sort: id
   :style: table
On a needflow, a query that returns the matched paths rather than the
matched nodes names the diagram’s edges as well as its nodes —
so the picture is the traversal itself,
not “these needs, and every link that happens to run between them”.
Here the same three-hop trace is drawn:
the two specifications, the requirement they realise,
and the programme it supports.
R_LINK is absent because no specification realises it,
so it lies on no matched path:
Drawing the traversal itself
.. needflow:: Specifications tracing to the programme
   :cypher:
      MATCH p = (:`dr-spec`)-[:links]->(:`dr-req`)-[:dr_supports]->(:`dr-project`)
      RETURN p
   :filter: id in ["P_DRONE", "R_SAFE", "S_VISION", "S_GEOFEN"]
   :show_link_names:
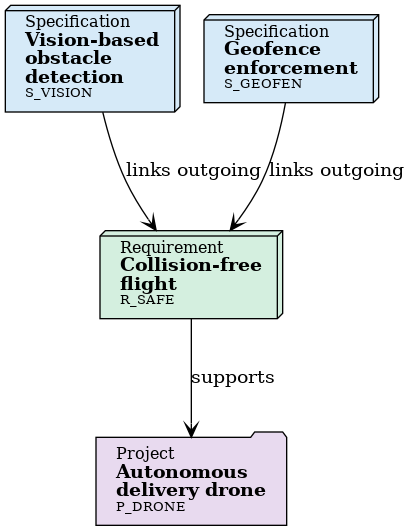
Specifications tracing to the programme
The :filter: beside it is the same portable pairing as above —
it is what a Sphinx build reads —
and on this model the two draw the same diagram,
the same four needs joined by the same three links.
That agreement is a property of the model, not a guarantee of the feature:
the python surfaces can only enumerate the needs the traversal happens to
reach, so as soon as a query selects edges the option model cannot express
the two builders deliberately draw different diagrams.
A needflow’s :cypher: can also name its EDGES records that boundary.
All three directives above carry two selections at once —
a :cypher: and the python surfaces (:types:, :status:) beside it.
That pairing is the deliberate portable idiom, not a mistake:
ubCode evaluates the Cypher and ignores the python surfaces,
while a Sphinx build ignores the :cypher: and evaluates the python ones,
so a single source renders under both tools —
which is what lets this page show the examples live.
Note
:cypher: is a ubCode extension.
Sphinx-Needs 8.4.0 and later accept the option and ignore it,
which is what makes the pairing above portable.
Earlier releases do not know the option at all:
on 8.3.1 a directive carrying a :cypher:
fails with unknown option: "cypher" and renders nothing —
the view simply disappears from the page,
with an ordinary build still reporting success
and only a build run with -W failing.
A document shared with a Sphinx-Needs older than 8.4.0
should therefore not carry one.
Keeping the two selections in agreement is your job. ubCode does not check that a query and a python expression pick the same needs — proving that in general is not possible — so a divergence shows up honestly, as the two tools rendering different results.
Scoping a pie chart.
A needpie takes a :cypher: too, and reads it differently:
a chart has no :filter: for a query to replace —
its selection is its content, one filter per line —
so the query scopes the chart.
The needs it returns are the universe those lines are counted in,
and each slice is that line’s filter intersected with the scope.
The lines still do the slicing.
A chart reads the python surfaces as that same scope, so the pairing works here exactly as it does on the three directives above. On this page’s model, “how do the specifications break down by status?” is one scope — the specifications — and two content lines for the split:
Scoping a chart
.. needpie:: Specifications by status
   :cypher: n.type = 'dr-spec'
   :types: dr-spec
   :labels: open, in progress
   :legend:

   status == 'open'
   status == 'in_progress'
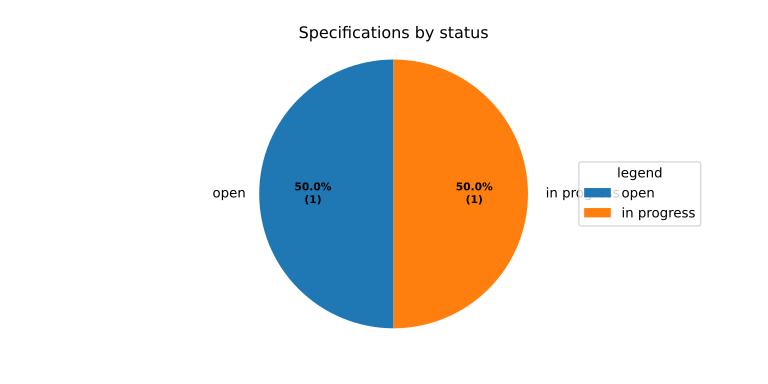
Both engines count the same two specifications and draw the same two slices —
one open, one in progress —
because the :cypher: and the :types: beside it pick the same needs:
ubCode evaluates the query and a Sphinx build scopes by :types:.
That pairing is portable from Sphinx-Needs 8.5.0, the release that made
:filter:, :status:, :tags: and :types: a chart’s scope
(sphinx-needs#1831)
and accepted :cypher: on both charts
(sphinx-needs#1818).
On 8.4.0 and earlier none of the five options is known on a chart:
the build reports unknown option and drops the directive,
so the view disappears from the page —
which is why a document sharing charts with a Sphinx-Needs older than 8.5.0
should carry neither spelling.
One caveat still travels with the pairing, recorded in
Needs chart views (needpie / needbar):
a chart’s counts cover needs only here against needs and their parts there,
so a project using parts reads lower values in ubCode whatever the scope says.
The stronger form of the same question — “how do the specifications that trace to the programme break down by status?” — is where the pairing runs out. Its scope is a traversal, and a traversal has no python spelling to pair with:
.. needpie:: Tracing specifications by status
   :cypher:
      MATCH (n:`dr-spec`)-[:links]->(:`dr-req`)-[:dr_supports]->(:`dr-project`)
      RETURN n
   :labels: open, in progress
   :legend:

   status == 'open'
   status == 'in_progress'
That block is shown as source only — not because a Sphinx build would refuse
it, but because it carries no python twin, and there is none to write.
ubCode’s python dialect judges each need on its own fields and cannot follow a
link (a Sphinx-Needs filter string can reach other needs, but an id /
type / status / tags test anded beside the traversal narrows
that view first, so the obvious one-line spelling under-counts there, usually to
nothing).
Written live, that chart would show different numbers in the two tools:
ubCode would count each line inside the traversal, while a Sphinx build,
ignoring the :cypher: and finding no scope beside it,
would count each line over the whole project.
A chart’s filter options SCOPE its slices records that boundary, and measures it.
See also
Cypher syntax for the query language itself —
operators, functions, parameters,
and the needtable column projections that let a RETURN name the
table’s columns.
Linting describes needs.cypher_vocabulary,
the diagnostic that catches a mistyped label or property before it
quietly empties a view,
and Differences from a Sphinx build records where the two engines diverge.
Counting and measuring
Beyond listing needs, you often want a single number —
how many items are in a given state.
The need_count role evaluates a filter expression
and renders the size of the matching set inline,
which is handy inside a status summary:
Counting needs
- Specifications in total: :need_count:`type == 'dr-spec'`
- Requirements still open: :need_count:`type == 'dr-req' and status == 'open'`
- Specifications in progress: :need_count:`status == 'in_progress'`
Specifications in total: 2
Requirements still open: 2
Specifications in progress: 1
Because the count is recomputed from the live model, the figures track your edits as you make them — add a specification and the total goes up on the next indexing pass.
Where to go next
You have now created a small traceable model — a project, its requirements, the specifications that realise them, and the links, references, tables, diagrams, and counts that tie them together. From here you can grow the model with confidence, because ubCode keeps every link and ID honest as you type.
Todo
Extend this tutorial with a section on importing existing needs from a JSON export, and on tracking progress over time with a metrics view.
Needs — the full
[needs]configuration reference.Writing a filter — the filter language used by the summary directives.
Coming from Sphinx-Needs — bringing an existing Sphinx-Needs project into ubCode.
Differences from a Sphinx build — where the live preview differs from a full Sphinx build.